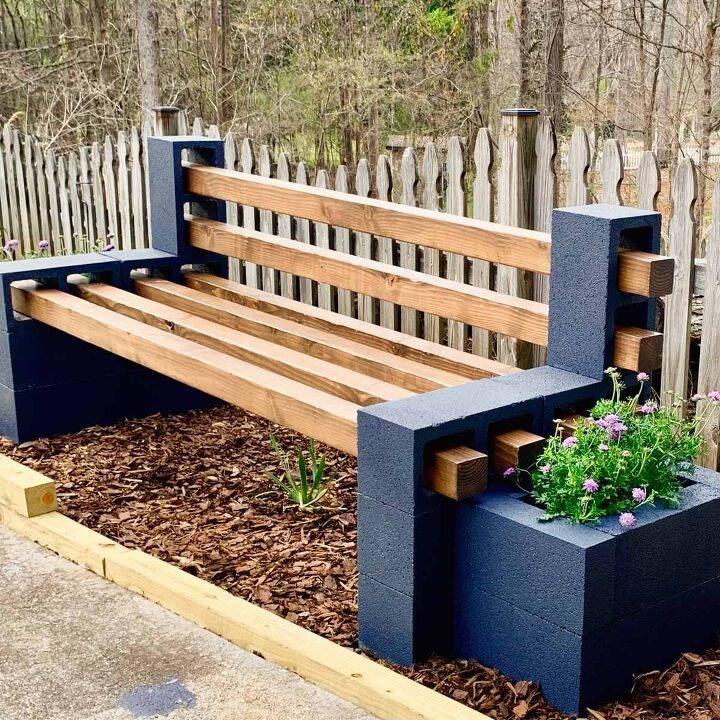
When it comes to outdoor seating, nothing beats a project that is not only functional but also adds a personal touch to your garden or patio. This DIY cinder block bench project might be rated as moderate difficulty due to the physicality involved, but trust me, the effort is worth it. Imagine sipping a cool drink on a warm evening, seated on your handcrafted bench, surrounded by your beautiful garden. It’s a perfect blend of rugged charm and comfort, making it a conversation starter for any outdoor gathering.
I first stumbled upon the idea of a cinder block bench when my neighbor, who always seems to have the most unique DIY projects, invited me over to admire his latest creation. The simplicity and sturdiness of his bench immediately caught my eye. After hearing about his process and seeing how beautiful and practical it was, I decided it was time to tackle this project myself. And now, I’m excited to share with you the detailed steps and tips to help you create your very own cinder block bench.
Contents
Materials and Equipment
Materials:
- 12 standard cinder blocks (16″x8″x8″, actual size: 15 ⅝” x 7 ⅝” x 7 ⅝”)
- 6 kiln-dried Douglas fir 4x4s (about 3 ½”x 3 ½”)
- Exterior wood stain and clear water-based exterior urethane
- Primer and exterior acrylic paint
- Construction adhesive
- TSP cleaner
Equipment:
- Orbital sander with 220 grit paper
- Paintbrushes and rollers
- Power washer or a bucket and nylon scrub brush
- Lint-free cloth
- Measuring tape
- Safety gloves and goggles
Steps to Make a Cinder Block Bench
Step 1: Wash the Cinder Blocks Start by cleaning your cinder blocks thoroughly. Place the blocks on something elevated so they don’t sit in their own dirt. Use TSP in your power washer or mix it in a bucket and scrub with a brush. Let the blocks dry completely in the sun, flipping them at least once.
Step 2: Prime and Paint the Blocks Spray a coat of primer on the blocks, ensuring all pores are filled, including inside the holes. Check the recoat times on the primer label. Once dry, apply the first coat of paint, waiting 4 hours between coats. You may need up to three coats for full coverage.
Step 3: Sand and Stain the 4x4s Sand the 4x4s with an orbital sander and wipe them down with a lint-free cloth. Apply wood conditioner with a brush, let it sit for 15-30 minutes, and wipe off any excess. Then, stain the wood, wiping off excess stain after a few minutes. Once dry, seal with clear urethane.
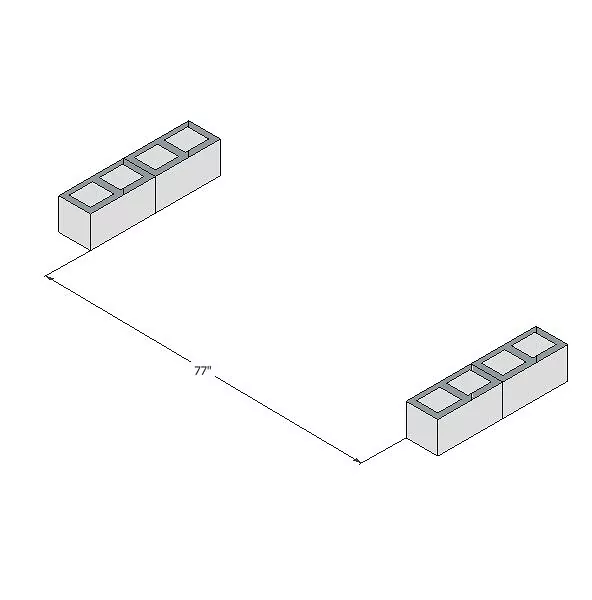
Step 4: Lay Out the Foundation Place the first 4 blocks at the desired length of the bench, 2 stacked on each side. Ensure the wider, cleaner edges are facing up. Apply construction adhesive to the edges of the blocks, then stack two more blocks on top of each side.
Step 5: Secure the Seating Blocks Position
the side-facing blocks to ensure the seating is aligned and level. Place four of the 4x4s in the holes to check alignment. Once satisfied, glue the side-facing blocks to the base, ensuring the wider, better-looking edges face outward.

Step 6: Attach the Back Support Blocks Apply glue to the back of the seating blocks, then place a block vertically on top. Ensure the glue stays within the end of the hole for a secure fit.
Step 7: Assemble the Bench Seating and Back Posts After the glue has become tacky, insert the posts into the holes, making sure they are evenly spaced. Allow the glue to cure for 24 hours before using the bench. Finally, add cushions and decorative pillows to complete your cozy outdoor seating.
Tips for Success
- Leverage for Lifting: Since lifting cinder blocks can be physically demanding, use a dolly or enlist help to move them around. This will save your back and make the process smoother.
- Drying Time: Ensure ample drying time for both the cinder blocks and the wood posts. If the weather is not cooperative, consider working in a well-ventilated garage.
- Adhesive Application: Be precise with the adhesive to avoid visible glue lines. It’s better to apply closer to the inside edge to prevent spillover.
Variations and Customizations
- Color Choices: Don’t limit yourself to grey blocks. Consider painting your cinder blocks in vibrant colors to match your garden decor.
- Additional Comfort: Add a backrest made from a wooden panel for extra support. Secure it with metal brackets for a sturdy finish.
- Planter Box Add-ons: Incorporate built-in planters at the ends of the bench. Use concrete blocks as the base and add soil and plants for a green touch.
FAQs
Q: Can I use untreated wood for this project? A: It’s best to use treated wood or kiln-dried wood if you plan on painting the blocks. Untreated wood is more susceptible to rot and weather damage.
Q: What type of paint is best for cinder blocks? A: Exterior acrylic paint is recommended for its durability and ability to withstand outdoor elements. Ensure you use a good primer to seal the pores of the blocks.
Q: How can I ensure the bench is level? A: Use a level during the assembly process. Adjust the placement of the blocks before applying the adhesive to make sure everything is even.
Q: Is it necessary to sand the wood before staining? A: Yes, sanding smooths the wood and allows the stain to penetrate evenly, resulting in a better finish.
Creating a DIY cinder block bench is not only a rewarding project but also a fantastic way to enhance your outdoor living space. With careful preparation and attention to detail, you can build a sturdy and stylish bench that will last for years. Whether you’re hosting a garden party or enjoying a quiet afternoon, your handmade bench will be a testament to your creativity and hard work. So, roll up your sleeves, gather your materials, and get started on this fun and functional project. Happy building!


